Cara masuk
bios Laptop SONY VAIO E Series – Ketika pertama
kali saya menginstall Laptop SONY VAIO E
series, saya kasulitan untuk mengatur biosnya karena tidak ada pilihan untuk
masuk di setingan bios seperti halnya laptop-laptop lain. Susah juga ya ini
Laptop, Pusing tujuh keliling , segala tombol sudah di coba, Mulai tombol F1
sampai F12 sudah saya coba tapi tetap saja tidak bisa. Bahkan tombol delete
juga tidak bisa. Saya coba Browsing di google.com, terlalu banyak artikel yang
menyarankan dengan menekan tombol ASSIST,
maka akan langsung masuk ke bios. Nah cara ini sudah saya coba dan berhasil.
Tinggal sesuaikan pilihanya saja. Banayk menunya kok disitu. Jika tidak bias coba
ulangi cara di atas tapi pastikan dulu power mati, kalau perlu cabut saja
baterainya dulu. Selamat mencoba semoga berhasil. Jika tidak bisa di bawa ke
tempat saya he he he
Tuesday, 3 May 2016
Thursday, 31 March 2016
Install Windows XP dalam 10 Menit
Menginstall Windows XP butuh waktu yang lumayan lama, apa lagi ada pekerjaan yang buru buru harus di selesaikan.
Alasan install windows banyak sekali, di antara karena system tiba tiba crash di saat kita membutuhkan.
Berikut saya tuliskan sedikit triknya, semoga bermanfaat...
= Langkah pertama seperti biasa, atur bios ke media booting bisa fashdisk maupun CDroom
= Ikuti langkahnya seperti biasa, hingga proses tampilan seperti di bawah ini

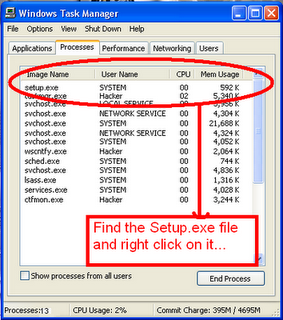
= Untuk membypass prosesnya, coba tekan tombol SHIFT dan F10 akan tampil task manager.
= Setelah jendela task manager tampil, cari proses setup.exe, klik kanan.
dan set priority ke Higest. ( Ini akan mempercepat proses setup )
Alasan install windows banyak sekali, di antara karena system tiba tiba crash di saat kita membutuhkan.
Berikut saya tuliskan sedikit triknya, semoga bermanfaat...
= Langkah pertama seperti biasa, atur bios ke media booting bisa fashdisk maupun CDroom
= Ikuti langkahnya seperti biasa, hingga proses tampilan seperti di bawah ini

= Untuk membypass prosesnya, coba tekan tombol SHIFT dan F10 akan tampil task manager.
= Setelah jendela task manager tampil, cari proses setup.exe, klik kanan.
dan set priority ke Higest. ( Ini akan mempercepat proses setup )
= Tinggal saja komputer untuk meneruskan cucian baju yang belum selesai, kemudian di jemur. gak usah nunggu kering tapi segera lihat komputernya apakah sudah selesai di install atau belum.
Selamat mencoba..
Pertanyaan silahkan kirim ke : edhipurwanto@gmail.com ( 0852-8949-5669 )
Monday, 14 March 2016
Hiden / Unhiden Drive in Windows 7
Step 1: Type CMD in
Start menu search area and hit Enter to launch Command Prompt. You can
also find the Command Prompt under Accessories category in Start menu.
In Windows 10 and 8.1, you can right-click on the Start button, and then
click Command Prompt to open the same.

Step 2: In the Command Prompt, type Diskpart and hit enter key. Click Yes if you are prompted with UAC (User Account Control) dialog-box.

Step 3: And then type List Volume and hit enter to see list of all drives.

Step 4: Select the drive that you want to hide. To do this, type Select Volume G (here, G is the drive letter) or Select Volume 8 (here 8 is the volume number)


Step 5: To hide a drive, type Remove Letter G. Here, G is the drive letter than you want to hide.

Step 6: You are done. Close the Command Prompt.
Method 2 of 2
To show the hidden drive, follow the steps given below:
Step 1: Follow the procedure mentioned in step 1, 2, and 3 of Method 1.
Step 2: Select the volume number for which you want to assign a drive letter and show in the explorer. Type Select Volume 8 (here, 8 is the volume number) and hit Enter key.
Step 3: Once selected, type Assign Letter G and hit Enter key to see the drive in explorer(replace G with the drive letter that you have previously removed).

Subscribe to:
Comments (Atom)