Cara masuk
bios Laptop SONY VAIO E Series – Ketika pertama
kali saya menginstall Laptop SONY VAIO E
series, saya kasulitan untuk mengatur biosnya karena tidak ada pilihan untuk
masuk di setingan bios seperti halnya laptop-laptop lain. Susah juga ya ini
Laptop, Pusing tujuh keliling , segala tombol sudah di coba, Mulai tombol F1
sampai F12 sudah saya coba tapi tetap saja tidak bisa. Bahkan tombol delete
juga tidak bisa. Saya coba Browsing di google.com, terlalu banyak artikel yang
menyarankan dengan menekan tombol ASSIST,
maka akan langsung masuk ke bios. Nah cara ini sudah saya coba dan berhasil.
Tinggal sesuaikan pilihanya saja. Banayk menunya kok disitu. Jika tidak bias coba
ulangi cara di atas tapi pastikan dulu power mati, kalau perlu cabut saja
baterainya dulu. Selamat mencoba semoga berhasil. Jika tidak bisa di bawa ke
tempat saya he he he
Showing posts with label Tutorial Software. Show all posts
Showing posts with label Tutorial Software. Show all posts
Tuesday, 3 May 2016
Thursday, 31 March 2016
Install Windows XP dalam 10 Menit
Menginstall Windows XP butuh waktu yang lumayan lama, apa lagi ada pekerjaan yang buru buru harus di selesaikan.
Alasan install windows banyak sekali, di antara karena system tiba tiba crash di saat kita membutuhkan.
Berikut saya tuliskan sedikit triknya, semoga bermanfaat...
= Langkah pertama seperti biasa, atur bios ke media booting bisa fashdisk maupun CDroom
= Ikuti langkahnya seperti biasa, hingga proses tampilan seperti di bawah ini

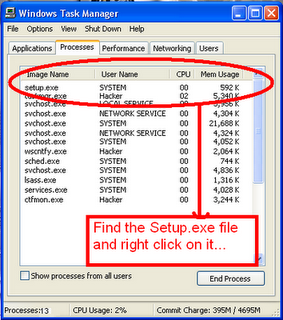
= Untuk membypass prosesnya, coba tekan tombol SHIFT dan F10 akan tampil task manager.
= Setelah jendela task manager tampil, cari proses setup.exe, klik kanan.
dan set priority ke Higest. ( Ini akan mempercepat proses setup )
Alasan install windows banyak sekali, di antara karena system tiba tiba crash di saat kita membutuhkan.
Berikut saya tuliskan sedikit triknya, semoga bermanfaat...
= Langkah pertama seperti biasa, atur bios ke media booting bisa fashdisk maupun CDroom
= Ikuti langkahnya seperti biasa, hingga proses tampilan seperti di bawah ini

= Untuk membypass prosesnya, coba tekan tombol SHIFT dan F10 akan tampil task manager.
= Setelah jendela task manager tampil, cari proses setup.exe, klik kanan.
dan set priority ke Higest. ( Ini akan mempercepat proses setup )
= Tinggal saja komputer untuk meneruskan cucian baju yang belum selesai, kemudian di jemur. gak usah nunggu kering tapi segera lihat komputernya apakah sudah selesai di install atau belum.
Selamat mencoba..
Pertanyaan silahkan kirim ke : edhipurwanto@gmail.com ( 0852-8949-5669 )
Monday, 14 March 2016
Hiden / Unhiden Drive in Windows 7
Step 1: Type CMD in
Start menu search area and hit Enter to launch Command Prompt. You can
also find the Command Prompt under Accessories category in Start menu.
In Windows 10 and 8.1, you can right-click on the Start button, and then
click Command Prompt to open the same.

Step 2: In the Command Prompt, type Diskpart and hit enter key. Click Yes if you are prompted with UAC (User Account Control) dialog-box.

Step 3: And then type List Volume and hit enter to see list of all drives.

Step 4: Select the drive that you want to hide. To do this, type Select Volume G (here, G is the drive letter) or Select Volume 8 (here 8 is the volume number)


Step 5: To hide a drive, type Remove Letter G. Here, G is the drive letter than you want to hide.

Step 6: You are done. Close the Command Prompt.
Method 2 of 2
To show the hidden drive, follow the steps given below:
Step 1: Follow the procedure mentioned in step 1, 2, and 3 of Method 1.
Step 2: Select the volume number for which you want to assign a drive letter and show in the explorer. Type Select Volume 8 (here, 8 is the volume number) and hit Enter key.
Step 3: Once selected, type Assign Letter G and hit Enter key to see the drive in explorer(replace G with the drive letter that you have previously removed).

Monday, 21 December 2015
Firebird 2.5
Firebird stable 2.5.x is located into this repository (ppa) for LTS and current supported Ubuntu releases
The ppa repository must be added this way
sudo add-apt-repository ppa:mapopa
Then you need to update the cache repository
sudo apt-get update
Here is how you can inspect the firebird2.5 related packages
apt-cache search firebird2.5-*
Install
the super server package (you will be asked about the SYSDBA password
and what service to enable : Super Server, Classic or Super Classic )
sudo apt-get install firebird2.5-super
The following extra packages will be installed:
  firebird2.5-common firebird2.5-common-doc firebird2.5-dev firebird2.5-server-common
 libfbclient2 libib-util
Suggested packages:
  libfbembed2.5 firebird2.5-examples firebird2.5-doc
The following NEW packages will be installed:
  firebird2.5-server-common firebird2.5-super
The following packages will be upgraded:
  firebird2.5-common firebird2.5-common-doc firebird2.5-dev libfbclient2 libib-util
5 upgraded, 2 newly installed, 0 to remove and 21 not upgraded.
Need to get 5,442kB of archives.
After this operation, 11.3MB of additional disk space will be used.
Do you want to continue [Y/n]? y
Or install Classic or Super Classic if you have more than one cpu (dual core or SMP machine) and want SMP support
sudo apt-get install firebird2.5-classic
or
sudo apt-get install firebird2.5-superclassic
You need to configure the package after is installed
sudo dpkg-reconfigure firebird2.5-super
Install the examples and dev files
sudo apt-get install firebird2.5-examples firebird2.5-dev
The employee.fdb archive will be under this dir /usr/share/doc/firebird2.1-examples/examples/empbuild/
cd /usr/share/doc/firebird2.5-examples/examples/empbuild/
sudo gunzip employee.fdb.gz
sudo chown firebird.firebird employee.fdb
sudo mv employee.fdb /var/lib/firebird/2.5/data/
Connect to database using the isql-fb console
$ isql-fb
SQL> connect "/var/lib/firebird/2.5/data/employee.fdb " user 'SYSDBA'
password 'SYSDBApassword';
always
use localhost: in front of db path when using classic or superclassic
in 2.5 this way the lock files and the shared memory segment will be
owned by the 'firebird' user. Another alternative is to add yourself to firebird group
$ sudo adduser `id -un` firebird
Then connect to the db in superclassic or classic
$ isql-fb
SQL> connect "localhost:/var/lib/firebird/2.5/data/employee.fdb " user 'SYSDBA'
password 'SYSDBApassword';
If all is ok then you will have the message with what database connected and what user and ready to use sql prompt
Database:  "/var/lib/firebird/2.5/data/employee.fdb ", User: SYSDBA
SQL>
Now you can check the server version and the tables
SQL> show tables;
       COUNTRY                                CUSTOMER
       DEPARTMENT                             EMPLOYEE
       EMPLOYEE_PROJECT                       JOB
       PROJECT                                PROJ_DEPT_BUDGET
       SALARY_HISTORY                         SALES

SQL> show version;
ISQL Version: LI-V2.5.0.* Firebird 2.5
Server version:
Firebird/linux Intel (access method), version "LI-V2.5.0.* Firebird 2.5"
Firebird/linux Intel (remote server), version "LI-V2.5.0.* Firebird 2.5/tcp (eeepc)/P11"
Firebird/linux Intel (remote interface), version "LI-V2.5.0.* Firebird 2.5 Release
Candidate 2/tcp (eeepc)/P11"
on disk structure version 11.1
To create a new database
SQL> create database "/var/lib/firebird/2.5/data/first_database.fdb" user 'SYSDBA'
 password 'SYSDBAPASSWORD';
SQL> connect "/var/lib/firebird/2.5/data/first_database.fdb" user 'SYSDBA'
password 'masterkey';
Commit current transaction (y/n)?y
Committing.
Database:  "/var/lib/firebird/2.5/data/first_database.fdb", User: SYSDBA
SQL>
If you want to create a simple table then insert 1-2 rows and select from it here is one example
SQL> CREATE TABLE TEST (ID INT NOT NULL PRIMARY KEY, NAME VARCHAR(20));
SQL> show tables;
       TEST
SQL> INSERT INTO TEST VALUES (1, 'John');
SQL> INSERT INTO TEST VALUES (2, 'Joe');
SQL> select * from test;

          ID NAME
============ ====================
           1 John
           2 Joe
To quit the isql-fb console type quit
SQL> quit
CON>;
For
a good open source GUI admin tool you might check the flamerobin
administration tool included in ubuntu repository can be installed by an
simple
sudo apt-get install flamerobin
Then use it from the menu Applications->Programming-> FlameRobin
To use firebird with php , you will need the php5 driver
sudo apt-get install php5-interbase libapache2-mod-php5
sudo php5enmod interbase
sudo /etc/init.d/apache2 restart
Next if you need to install an php administration tool like Firebird Web Admin
sudo apt-get install git-core
git clone git://github.com/mariuz/firebirdwebadmin.git
mv firebirdwebadmin /var/www/html/firebirdwebadmin
and load it in the browser http://localhost/firebirdwebadmin
It should look like this screen shot
=Other Firebird Related Guides=
You can start with the main Firebird documentation.
To use Ruby language with firebird I wrote a tutorial on howto install the stable driver.
For Ruby on Rails i wrote howto install the Firebird Active Record Adapter and start an application.
To use python you must use the official stable firebird python driver and here is howto install and use the driver.
For Lazarus IDE i wrote an visual guide on howto use the database aware components in a simple application that uses Firebird.
Lua Language does have a good driver and there is a Getting started guide with firebird on ubuntu
Server Side Javascript is served with the help of a pure Javascript nodejs driverTuesday, 17 November 2015
Tidak bisa install windows 8
Ketika install windows 8 muncul pesan seperti berikut:
"windows cannot installed to this disk. the selected disk is of the gpt partition style"
Solusinya adalah seperti ini :
"windows cannot installed to this disk. the selected disk is of the gpt partition style"
Solusinya adalah seperti ini :
Convert GPT to MBR with Diskpart
In some technology or computer forum, some technicians give some advice that convert GPT to MBR with Diskpart, which is run by program code. The specific steps are following below:- Enter system installing interface by using Win 7 disc or USB hard drive boot. and then press “Shift”+”F10” to open the command prompt.
- Input “Diskpart” (do not input quotation mark, the following as well), and then press “Enter”to enter operating interface.
- Input “list disk”: to check hard disk properties. Pay more attention to capacity of hard disk to select. Usually, disk 0 is hard disk, and disk 1 is the usb dirve where wins 7 install.
- Input “select disk 0”: to select disk 0 as the disk that is operating.
- Input “clean”: to clean up current hard disk’s partition.
- Input “convert mbr”: to convert GPT into MBR.
- Input “create partition primary size = xxx”: to create the size of primary partition.
- Input “format fs = ntfs quickly”: to format disk to NTFS quickly.
- Input “exit”: to finish operating.
- Input “exit”: to shut down the command prompt.
Monday, 10 August 2015
Install WintoUSB di Linux Mint
Currently WinUSB is not in the Ubuntu Software Center for Ubuntu
14.04 and there is no PPA for installing WinUSB in Ubuntu 14.04 either,
so you have to install the Ubuntu 13.10 version.
WinUSB is a tool for creating a bootable USB flash drive used for installing Windows. For creating a bootable USB flash drive for installing Ubuntu use the built-in Startup Disk Creator application. For creating a bootable USB flash drive for installing other Linux distros use UNetbootin from the Ubuntu Software Center.
- Open the terminal using the keyboard combination Ctrl+Alt+T.
- Download the winusb package that is compatible with your operating system's architecture:
for Ubuntu 32-bit:
wget https://launchpad.net/~colingille/+archive/freshlight/+files
for Ubuntu 64-bit:/winusb_1.0.11+saucy1_i386.deb
wget https://launchpad.net/~colingille/+archive/freshlight/+files/winusb_1.0.11+saucy1_amd64.deb - Install winusb:
sudo dpkg -i winusb_1.0.11+saucy1* - Fix dependencies errors:
sudo apt-get -f install
WinUSB is a tool for creating a bootable USB flash drive used for installing Windows. For creating a bootable USB flash drive for installing Ubuntu use the built-in Startup Disk Creator application. For creating a bootable USB flash drive for installing other Linux distros use UNetbootin from the Ubuntu Software Center.
Wednesday, 8 July 2015
Install VNC Server Di Linux Mint
Setelah sebelumnya posting tentang VNC server di debian, lanjutan kali ini tentang instalasi VNC Server di UBUNTU dengan tampilan GUI META desktop environment. Versi Ubuntu yang saya pakai adalah Ubuntu Saucy Salamander (13.10).
Langkah – langkah instalasi:
- Install META desktop environment
- Install VNC server
- Konfigurasi VNC Server
- Auto start on boot VNC Server
1. Install META desktop environment
Tambahkan lebih dulu salah satu repo berikut ini di
/etc/apt/sources.list (pilih salah satu saja)sudo add-apt-repository "deb http://repo.mate-desktop.org/ubuntu saucy main"sudo add-apt-repository "deb http://packages.mate-desktop.org/repo/ubuntu saucy main"sudo add-apt-repository "deb http://mirror1.mate-desktop.org/ubuntu saucy main"
Install META desktop environment
sudo
 apt-get update
sudo apt-get --yes --quiet --allow-unauthenticated install mate-archive-keyringsudo apt-get updatesudo apt-get install mate-coresudo apt-get install mate-desktop-environment
2. Install dan Start VNC server
sudo
 apt-get install vnc4server
vncserver
masukkan password
dan konfirmasi password. Langkah ini sekaligus membuat konfigurasi
default start up VNC.
Selanjutnya stop VNC server untuk meng-edit konfigurasinya.
Selanjutnya stop VNC server untuk meng-edit konfigurasinya.
vncserver
-kill :1
3. Edit Konfigurasi VNC Server
sudo
nano .vnc/xstartup
Edit pada
baris-baris berikut ini:
#!/bin/sh# Uncomment the following two lines for normal desktop:unset SESSION_MANAGERunset DBUS_SESSION_BUS_ADDRESS# exec /etc/X11/xinit/xinitrc[-x/etc/vnc/xstartup ] && exec /etc/vnc/xstartup[-r$HOME/.Xresources ] && xrdb $HOME/.Xresourcesxsetroot-solidgreyvncconfig-iconic&# x-terminal-emulator -geometry 80x24+10+10 -ls -title "$VNCDESKTOP Desktop" &# x-window-manager &mate-session &# gnome-session --session=ubuntu-2d &
4. Membuat script auto-start on boot
Langkah selanjutnya yang tidak kalah penting adalah membuat script auto start supaya VNC Server berjalan otomatis setelah server di restart (rebooting). Berbeda dengan CentOs yang cukup bisa dilakukan dengan command chkconfig.
4.1. Buat script startup lalu edit.
touch
 /etc/init.d/vncserver
chmod +x /etc/init.d/vncservernano /etc/init.d/vncserver
4.2. Copy paste kode berikut ini lalu simpan
#!/bin/sh
 -e
### BEGIN INIT INFO# Provides: vncserver# Required-Start: networking# Required-Stop: networking# Default-Start: 2 3 4 5# Default-Stop: 0 1 6### END INIT INFOPATH="$PATH:/usr/X11R6/bin/"# The Username:Group that will run VNCexport USER="root"#${RUNAS}# The display that VNC will useDISPLAY="1"# Color depth (between 8 and 32)DEPTH="16"# The Desktop geometry to use.#GEOMETRY="x " #GEOMETRY="800x600"GEOMETRY="1024x768"#GEOMETRY="1280x1024"# The name that the VNC Desktop will have.NAME="your-vnc-server"OPTIONS="-name ${NAME} -depth ${DEPTH} -geometry ${GEOMETRY} :${DISPLAY}". /lib/lsb/init-functionscase "$1"instart)log_action_begin_msg "Starting vncserver for user '${USER}' on localhost:${DISPLAY}"su ${USER}-c"/usr/bin/vncserver ${OPTIONS}";;stop)log_action_begin_msg "Stoping vncserver for user '${USER}' on localhost:${DISPLAY}"su ${USER}-c"/usr/bin/vncserver -kill :${DISPLAY}";;restart)$0stop$0start;;esacexit 0
sudo chmod +x /etc/init.d/vncserver
4.3. Atur script menjadi auto start pada saat proses booting
sudo update-rc.d vncserver defaults 99 |
4.4. Start VNC Server
/etc/init.d/vncserver startJalankan VNC viewer di client, lalu koneksikan ke server, dengan format
IP_address_server:5901,
port 5901 bisa diganti sesuai jenis user dari 1, 2 dan seterusny.
Subscribe to:
Comments (Atom)